Storyline 3: Disabling the default Next button
When you want to force your learner to review all aspects on a page, a feature you would like to add to your training design is to applying a True/False Variable on the default Next button.
This is a great feature when you want forced interactions in your page before the learner can go to the next page.
Before you begin and applying these steps in your project, create buttons on your slide with visited states and pop-up layers. To learn how, visit my other posting here.
Level of difficulty: Intermediate
Follow the detailed steps. Click the + to expand.
Creating a True/False variable
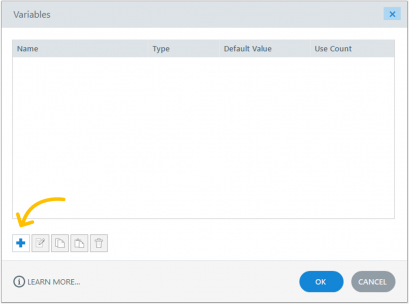
1. Refer to the Triggers panel and click the Manage project variables button to create a new variable – A variables window will appear

2. Click the “+” button to create a new variable – A variable pop-up window will appear
3. Input the following:
• Name: (for example, SlideComplete)
• Type: True/False
• Value: False
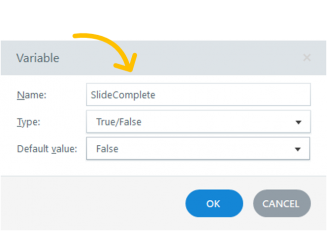
4. Click the OK button
Adding a trigger to the slide when the learner visited all the buttons
An example of a specific event would be when the user clicked all the buttons.
1. Refer to the Triggers panel
2. Click Create a new Trigger button – The trigger Wizard window will appear
3. Input/select the following:
• Action: Adjust Variable
• Variable: SlideComplete
• Operator: = Assignment
• Value: Value; True
• When: State
• On: Select all the named buttons on the slide
• Are: Visited
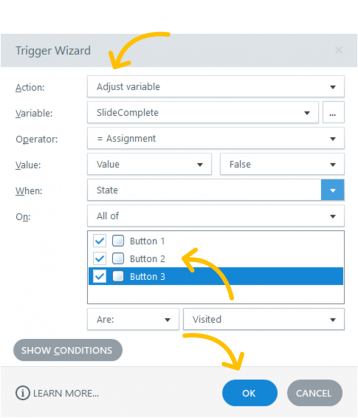
4. Click the OK button
Adding a condition to the next button so it will ONLY work if the user has clicked each button
1. Refer to the Triggers panel
2. Click Create a new Trigger button – the Trigger Wizard window will appear
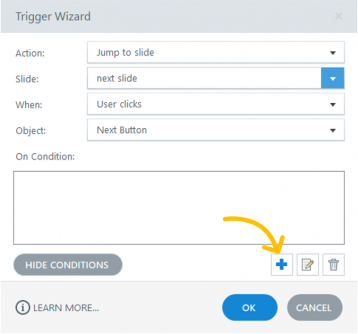
3. Input/select the following in the Trigger Wizard:
• Action: Jump to slide
• Slide: next slide (or name of a preferred slide)
• When: User clicks
• Object: Next Button
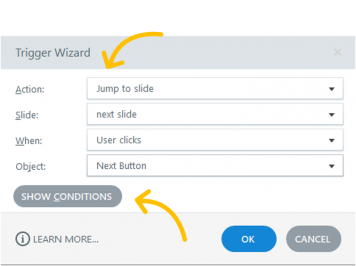
4. On Condition, click the “+” button (Add a “New” or “Or” condition) – the Add Trigger Condition pop-up window will appear
5. Input/select the following:
• List: Variable
• If: SlideComplete
• Operator: == Equal to
• Type: Value
• Value: True
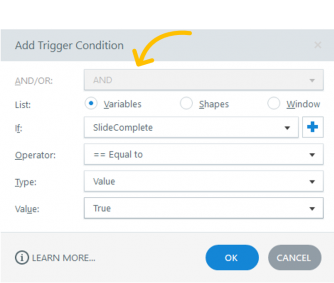
6. Click the OK button to close the Add Trigger Condition pop-up window
7. Click the OK button to close the Trigger Wizard window
8. Save your project
9. Publish your project to AICC or to SCORM
Did you find this useful? We need your support to empower others like you through learning.
