Storyline 3: Restrict or lock down your navigation
Learn how to restrict or lock down navigation throughout a Storyline course until the timeline ends.
By applying this feature in your design, you’re making sure your learners don’t:
• Skip ahead by clicking the built-in next button
• Jump from one topic to the other using the built-in navigation menu
Only until the timeline has completed, the learner can move to the next page of their learning. Before following these steps, have your project ready with all your pages built and be in slide view.
Level of difficulty: Intermediate
Follow the detailed steps. Click the + to expand.

Modifying your navigation menu to either restricted or locked
1. Select your first slide in slide view.
2. From the HOME tab, click the Player button from the Publish section – the Player Properties window will appear.
![]()
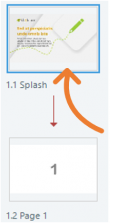
3. Click the Menu button from the Data section. You will see a list of all your pages.
![]()
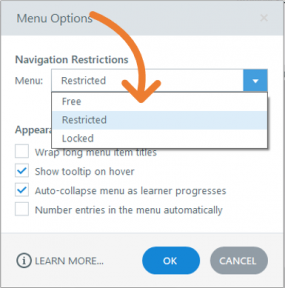
4. Click the gear icon for additional options – a Menu Options window will appear.
![]()
5. From the menu dropdown, select Restricted. When selecting Restricted, you allow the learner to jump to previous slides but not jump ahead. If you were to select Locked, learners can’t jump back or forward.
6. Click OK to close the Menu Options window.
7. Click OK to close the Player Properties window.
Altering the Master Slide to modify the built-in next button
1. Click on the VIEW tab.
2. Open the slide master by clicking the Slide Master button.
![]()
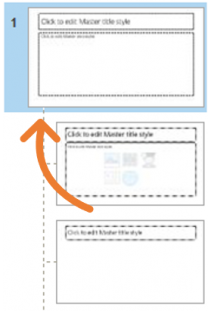
3. Select the Master slide or Parent slide. Do not select the individual layouts.
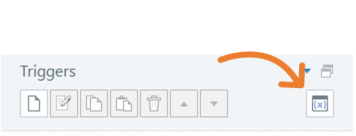
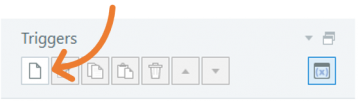
4. Refer to the Triggers panel and click the Manage Project Variables button – the variables window will appear.
5. In the Variables window, click the “+” button to add a variable – a variable pop-up window will appear.
![]()
6. Enter the following:
• Name: For example, GoNext
• Type: True/False
• Default value: False
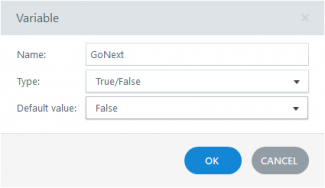
7. Click the OK button to close the Variable window
8. Click the OK button to close the Variables window
Creating your triggers
Trigger 1
1. Refer to the Triggers panel.
2. Click the Create a new trigger button – A Trigger Wizard window will appear.
3. Enter the following:
• Action: Adjust variable
• Variable: Select the newly created variable. For example, GoNext
• Operator: = Assignment
• Value: Value; False
• When: Timeline starts
• Object: Select the Slide Master (make sure you do not select from the drop-down any of the object on the slide)
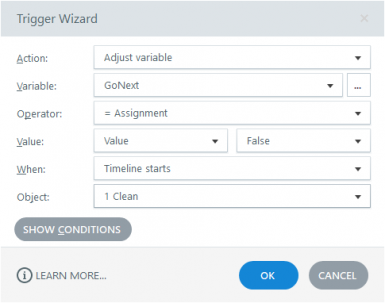
4. Click OK to close the Trigger Wizard window.
Trigger 2
1. Refer to the Triggers panel.
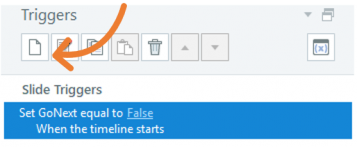
2. Click the Create a new trigger button – A Trigger Wizard window will appear.
3. Enter the following:
• Action: Adjust variable
• Variable: Select the newly created variable. For example, GoNext
• Operator: = Assignment
• Value: Value; True
• When: Timeline ends
• Object: Select the Slide Master
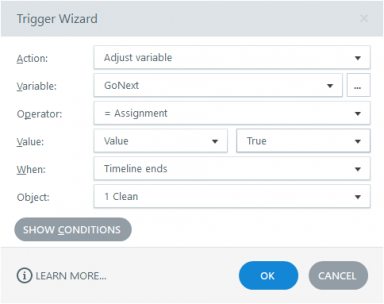
4. Click OK to close the Trigger Wizard window.
5. Close the slide master by clicking the Close Slide Master View button from the Slide Master tab.

Adding a condition to the default next button to only advance when the variable is true
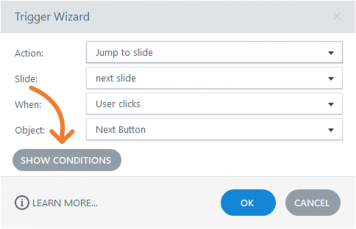
1. Select the first slide.
2. Refer to the Triggers panel.
3. Double click Jump to next slide trigger – the Trigger Wizard window will appear.
4. Click the Show Conditions button.
5. Click the “+” button to add a new “add” or “or” condition – the Add Trigger Condition window will appear.
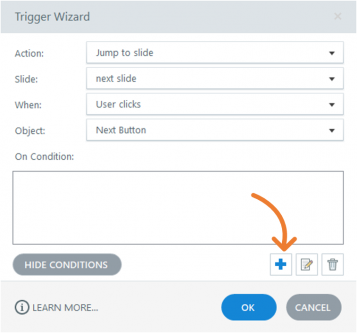
6. Enter/select the following:
• List: Variable
• If: GoNext
• Operator: == Equal to
• Type: Value
• Value: True
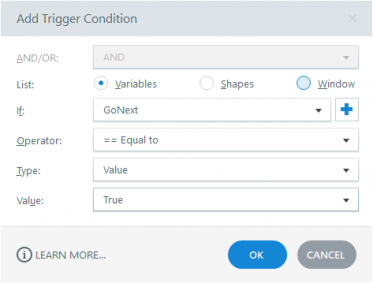
7. Click the OK button to close the Add Trigger Condition window.
8. Click the OK button to close the Tigger Wizard window.
Applying the modified trigger from your first slide to the other slides
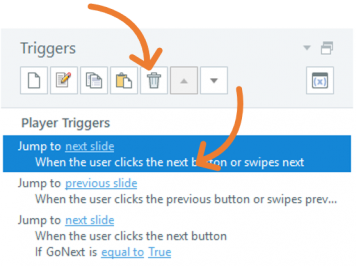
1. Refer to the Triggers panel on your first slide.
2. Highlight your Trigger with the new condition and click the Copy the Selected Trigger button.
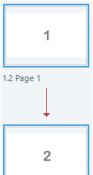
3. Highlight your other slide by selecting your slide, press the SHIFT key, and click the last slide.
4. When all your slides are selected, press CTRL + V to paste the trigger with the new condition.
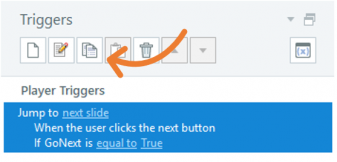
5. Visit each slide to verify the new trigger was pasted into it. Notice in each slide you should have two triggers to jump to next slide. They should include the original trigger without the condition and the new trigger with the condition.
6. Delete the original jump to next slide trigger each slide by highlighting the trigger and clicking the Delete the Selected Trigger button.
7. Save and preview your project.
8. Publish to SCORM or AICC.
Did you find this useful? We need your support to empower others like you through learning.