Storyline 3: Applying Visited and Disabled states
One feature you would like to add to your training design is to use the visited and disabled states. This feature will indicate to your learners they visited an area of a slide. These steps will also show how you can disable the button after they clicked it.
This is a great feature when you want show the learner they visited the content.
Follow the steps. Click the + to expand.

Create a new project or open an existing project
1. Click New Project
2. In Story View, rename your Scene and Slide by double-clicking the scene name field and the slide name field
3. If applicable, add a new slide by clicking New Slide from the home tab and selecting your slide layout
4. Rename the new slide by double-clicking the slide name field
5. Save your project by clicking File, selecting Save As
Modifying Slide Properties
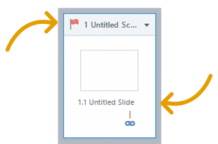
1. In Story View, select your slide
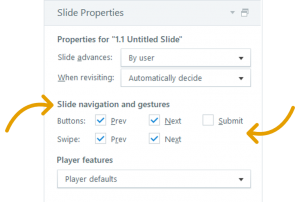
2. Go to Slide Properties panel and refer to Slide navigation and gestures
3. Uncheck:
• Prev
• Next
• Submit
4. Double-click the slide in Story View
Creating your button objects on the slide
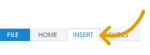
1. Click the Insert tab
2. Click Button from the Interactive Objects section

Label your buttons
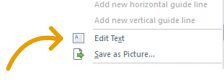
1. Right-click the button
2. Select Edit Text from your dropdown list
3. Label your button
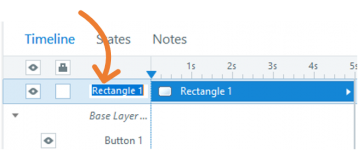
Name your button in your Timeline
1. Select the button on the slide to highlight the object in your Timeline
2. Double-click the name field in the Timeline
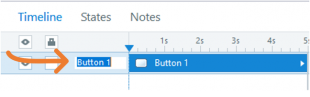
3. Rename the object's name
4. Repeat the steps until the number of buttons meet your design requirements
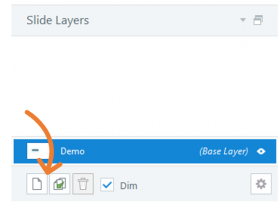
Creating your layer objects on the slide
1. Refer to Slide Layers panel in slide view
2. Click New Layer
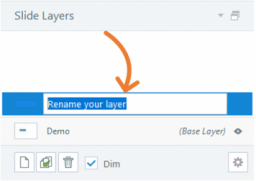
Rename your Layer
1. Double-click the layer to enable the name field
2. Rename your layer
Adding a shape to your layer
1. Ensure your renamed layer is highlighted
2. Click the Insert tab
3. Click Shape from the Media section
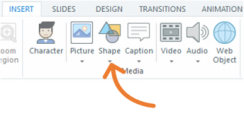
4. Choose a shape and insert it to your slide layer
Adding content to your shape
1. Right-click your shape
2. Select Edit Text from the dropdown list
3. Add your content
Rename your shape in your timeline
1. Select the shape on the slide layer to highlight the object in your Timeline
2. Double-click the name-field in the Timeline and rename the object's name
Add a Close button to the layer
1. Click the Insert tab
2. Click Button from the Interaction Objects section
3. Right-clicking the button and select Edit Text from the dropdown list
4. Label your button (for example, close)
5. Name the button in your Timeline by selecting the button in the slide layer to highlight it in your Timeline
6. Double-click the name-field in the Timeline and rename the object's name
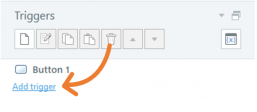
Add a Trigger to the close button in your layer
1. Select the button
2. Refer to the Triggers panel and click Add trigger hyperlink - The Triggers Wizard window will appear
3. Apply the following values to the fields in the Trigger Wizard:
• Action: Hide Layer
• Layer: Select this Layer. If you have more than one layer, select the layer name
• When: User clicks
• Object: Select the object-name in context to the layer
4. Adjust the fields and click the OK button
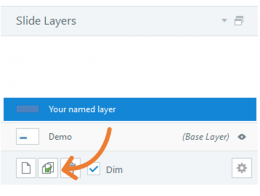
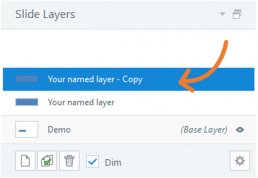
Duplicating your layers (to match the number of buttons you created)
1. Select the layer from your Slide Layers panel
2. Click the Duplicate Selected Layer button and a copy of your layer will appear
3. After duplicating your layer(s), do the following:
• Rename the copy of the layer by double-clicking on the name-field and renaming it
• Rename your shape object
• Change-out the content to reflect your layers
• Rename your all object's name in the timelines
• Modify the trigger of your close button
4. Repeat steps until the number of layers match the number of buttons you created
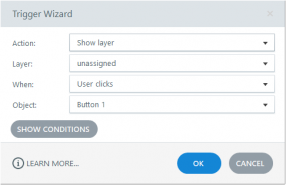
Adding triggers to buttons
Make sure you are on your main Slide View and not in your layers view. Check by going to your Slide Layers panel and verifying if your (Base Layer) is selected.
1. Select the button
2. Refer to the Triggers panel and click Add trigger hyperlink. The Trigger Wizard will appear
3. Apply the following values to the fields in the Trigger Wizard
• Action: Show Layer
• Layer: Select the layer you would like to appear which would be the name your gave to the layer object
• When: User clicks
• Object: Name of the button object
4. Adjust the fields and click the OK button
Modifying the button States
Modifying the Visited states
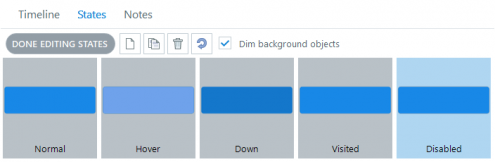
1. Click the States tab beside your Timeline
2. Click the EDIT STATES button
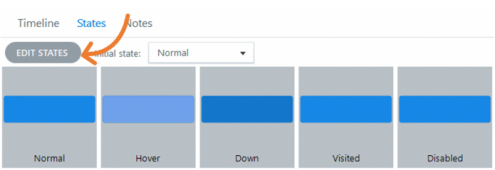
3. Click a button object on your slide
4. Select the Visited state
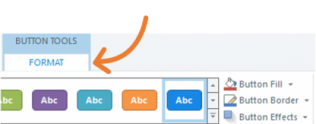
5. Click the FORMAT tab and adjust the button style so it is visually different than the other buttons
6. Repeat the steps to all your Visited state buttons
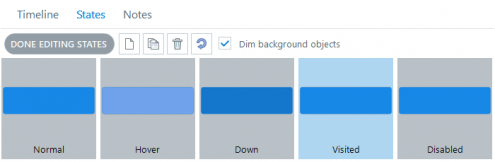
Modifying the Disabled state
1. Select the Disabled state
2. Click the FORMAT tab and modify the button style so it is visually different than the other buttons
3. Repeat the steps to all your buttons
4. Click the DONE EDITING STATES button
![]()
5. Return to your timeline by clicking the Timeline tab
![]()
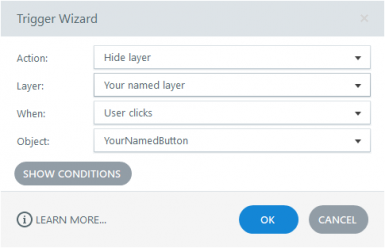
Creating a Visited and a Disabled trigger on the slide
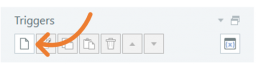
1. Click on a button object
2. Refer to your Triggers panel and click Create a New Trigger. The Trigger Wizard will appear
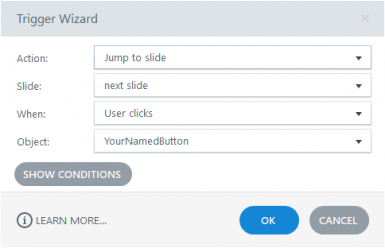
4. Apply the following values to the fields in the Trigger Wizard window:
• Action: Change state of
• On Object: Select the button (name of) object you would like to change the state of when the user has clicked on it
• To State: Visited
• When: User clicks
• Object: Name of the (button) object
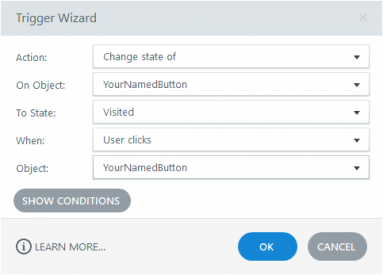
3. Click the OK button
5. Repeat the steps to all your buttons
6. When you're done applying the Visited trigger, apply the Disabled trigger by following the same steps.
7. Save, test your project, and when you're ready, publish your project to AICC or to SCORM for your LMS
Did you find this useful? We need your support to empower others like you through learning.
[wpedon id=”1451″ align=”center”]